I was six when my class went for a walkabout in our village, we were looking at the different types of houses people lived in. Immediately I got home I told Mum I needed to live in a bungalow. Simply, I wanted to be able to go to my bedroom on my own….a year later we had moved….to a bungalow.” This was the beginning of my dream of a lifetime accessible home.
Independently getting around my home
 I began dreaming about my own lifetime accessible home at about the age of 14, maybe even before. In the years that followed each time we went to a new place I noted what I liked (or didn’t). Whether it was a public building, a stately home, a friend’s house I looked at what would work for me. The years of planning informed space and flow, room use, finishes, flooring, access, technology and colours. My lifetime accessible home has been designed to accommodate my powered wheelchair(s). In addition, I considered my need to use technology for many tasks. Then there was the need for personal assistants who work with me on virtually everything I do. So, hopefully I have anticipated my changing needs for the future”
Knowing what will work for ‘me’
I’m told the principles of good design are the same for any build, whether this is a new lifetime accessible home from the ground up or alterations to your existing home. As a client knowing what you want cannot be underestimated. You don’t need to know exactly what the finished product will look like in its entirety. I’ve found that’s the fun of working with an architect and a design team. But what really helps is to have thought about how you will use the space, who with and when. Importantly a new build home is just that, an empty shell until you start to make it yours. Something I do in life anyway is to start with the end in mind. I find this can help focus everyone on what is needed for a lifetime of great living. It’s especially important for a lifetime accessible home, once it is built it would be costly and challenging to adapt if you don’t get it right.
Conceptualising your dream lifetime accessible home
The basics
I wanted my house to be suitable for me, it had to be a tranquil haven, peaceful, calm but welcoming. Like many people I love socialising so it also needed to work as a party house. I happen to have a disability, and use a power wheelchair, so I had quite specific needs for my lifetime accessible home. The rooms had to be big enough for day to day living. There had to be storage for all my equipment. Rooms for the team members who support me to be independent and for my future family. Little things like power sockets and much more.
Creating a concept board
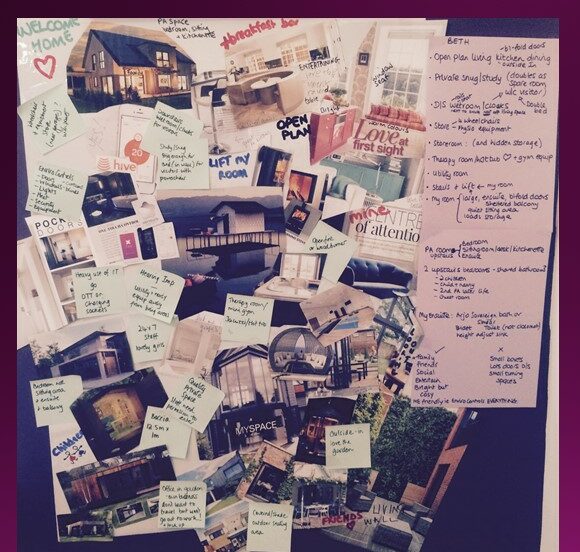
When it came to conceptualising my home I tore pages from dozens of (house, garden and living) magazines. Nothing was a bad idea or wrong, everything I liked instinctively was put in a pile that grew and grew. These concepts were then themed and rationalised, I mean how many real fires does a girl need, probably not the 17 nearly similar ones I liked? The result, besides fireplaces, was natural wood, glass, light, a contemporary feel, green walls, a balcony, a chandelier (or two), the external look of the house and bringing the outside in. These were pasted onto 2 A0 sheets and grouped by room, theme or area with added notes. Over the course of the planning and building process we all referred to this continually to ensure we stayed true to my original concept.”
The value of a good concept board
Concept boards are a great tool to use when clarifying your ideas and visualising what you want. They are then really useful when interviewing architects. It can also be used for selling your dream to the planner of what your need in your lifetime accessible home. Or talking through your ideas with neighbours and helping the builder and tradespeople stay on track. Take your time in getting your visualisation the way you want it. This is not to be rushed, it is better to do it over a few weeks or months than in just a few days.
Sharing your vision
Everyone is entitled to change their mind in a design process but if you can share your vision it really helps others to buy into what is important to you, and why. It is the first step to making your dream a reality. Below is my finished concept board for my lifetime accessible home. I had a lot of ‘notes’ to make sure there would be no misunderstanding of what I wanted.
What a concept board is not
This process is not trying to design the shape of the building, but facilitating the creation of a style, a feel or a look. It is a way of tying together design ideas you like, the colours that make you feel good, and finishes that are both practical and inspiring. You will live a long time with the finished product of your labours, and spend a lot of money in the process, so being sure about what is for you is important.
How we approached creating a concept board:
- Beg or buy home, garden and lifestyle magazines (as you will likely destroy them don’t promise to return them). They don’t have to be the latest ones!
- Either set aside a block of time every few days or snatch a few minutes when you can. Sit down and systematically turn slowly every page of the magazine. Without judging or asking why just tear out every picture that you like. It can be interiors, garden features, a sofa, an ornament, the colour of a wall, lettering, a front door, a staircase, a picture of a lake……anything that appeals to you.
- If you are sat at the doctor’s or the dentist’s waiting room and something in a magazine catches your eye then photograph it to print out at home.
- When you are out and about and see something you like, or something that inspires you, then photograph it, or buy a postcard…..try to keep a visual reference to add to your concept board. This can be buildings, interiors, scenic views or people in a café.
- Once you feel you have collected ‘enough’ start to sort it into categories: fireplaces, balconies, lights, garden, kitchen etc.
- Take out duplications.
- At any stage you can change your mind, but this is a good time to compare the things you have and take out those that are not quite so attractive now you have several things to consider.
- Sort things into piles of must-have or essential, nice to have, and completely frivolous but could be included (yes I do have those chandeliers that didn’t make it onto the final concept board).
- You might not have every nook and cranny of your house conceptualised in your head, but imagine standing outside the front door…..what will the outside of the house look like? What will it feel like? Who will use each room or area? Take pictures from your inspiration pile and group them together for each area of the house.
- Arrange your visuals in groups onto your big card(s)
- Stick them down
- Add keynotes, we used post-it notes and coloured A4 sheets around the outside of the visual, and write on the visuals too if it helps explain things
- Display them proudly where they can be a talking point.
Space and Flow
My space…….
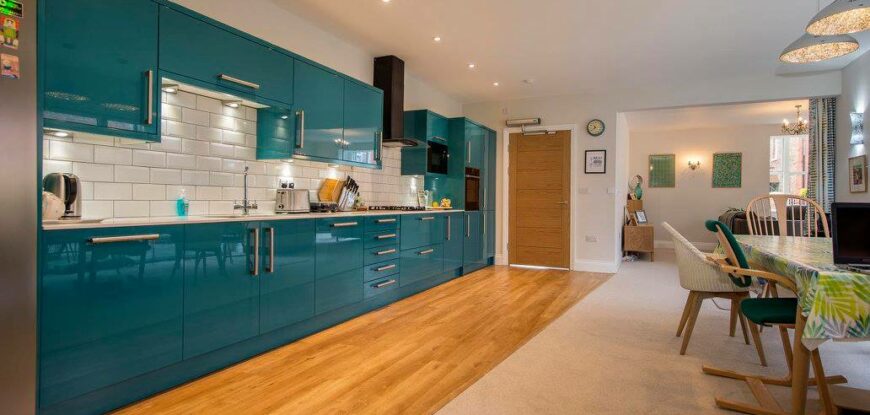
I had some clear ideas about the spaces I wanted to live in. My kitchen/diner would be the hub of my home, no one should enter the house without me knowing. I wanted to be able to see everything so I could direct activities, my seat at the table had to face into the room.
…..and working space….
Having had years of people having to dance around my chair and climb over furniture I knew I needed space for an assistant to work around me. We’d moved to a bungalow when I was 7, and for 2-3 years it was perfect. Then I got a power chair and as a result couldn’t use it in the house. There was not enough room to get through the narrow angled corridors and doors. All these things, and much more drove the spaces I needed in my lifetime home.
…..and flow
The architect we chose talked about flow in our first meeting, and together we worked on understanding which rooms would be most used, and how. I made a decision that no room in my home should be banned from me entering, especially if I have a family in the future. This really influenced the layout and utilisation of the site and the space available to get what works for me.
Floor surfaces
I sometimes crawl and when I use my walking frame I am safer on carpets as the wheels can slip on hard surfaces. This meant apart from the internal lobbies and the kitchen working space which are laminate floors everywhere else has carpet with a deep underlay.
Part M (what the regulations say you need)
Again knowing what you need is imperative. Architects and planners in the UK often refer to ‘Part M’ planning guidance for lifetime accessible homes. Unfortunately, this is outdated and is particularly unhelpful when it comes to someone in a power chair who might need hoists and additional working space. Power chairs have got bigger over the years and so it is crucial to take each individual’s specific needs into consideration. Here is a link to my blog about Part M and some of the things that need to be taken into account.
Tips when planning space requirements
Research is essential in the planning stages. Start with knowing what the size of your chair is with you seated in it, and if you are planning to change it take the biggest size it might be into consideration, and remember your feet will stick out off the footplates. If you are planning for a child make sure you look at what they might need as an adult.
Turning circles
A good rule of thumb is that a powerchair turning circle for ease should be 1500mm. When you measure out a room do a scale drawing with furniture so you can check everything will work for you, and if you have a personal assistant or use a hoist for transfers factor this into your measurements.
Doorways
Remember doorways need to be wide enough not just to get through but also to cope with needing to turn into a room. The recommendation is 900mm but many people go for wider, even opting for double opening doors for some rooms.
Practical storage, storage and more storage
It’s also important to consider where you are going to store equipment, especially wheelchairs, when not in use. My rear lobby which is the main exit/entrance to the house has a deep cupboard with sliding doors along the wall. There is room for 4 chairs (yes 4 chairs!), this includes my boccia playing chair, travel chair, day chair, folding manual chair and a shower chair for travel. Along the back of the wall are charging points and a shelf for chargers. When I back into the wheelchair space in the cupboard there is room for me to take off my coat, change footwear and get out into the lobby with an assistant to help me transfer to my walking frame or a different chair.
Storage is essential, not just for essential kit but also ask yourself where will you put your Christmas decorations? I was shocked that within two days of moving in every storage space was filled. You can never have enough space for essential items.
Ask yourself what you want from each area of your house.
Eating and dining
In the dining area if you are in a position at the table can other people get to and from their seats? Will you be sat with your back to the action in the kitchen? If a friend in a wheelchair comes over is there room for them at the table?
In and out of your chair
Are you going to always be in your wheelchair or do you want to transfer to a recliner or sofa to watch TV? Is there room for a visitor in a wheelchair to also sit comfortably in your home?
Rooms you don’t want to access
What rooms in the house do you need to be able to get into? Consider the utility or a personal assistants bedroom.
Making the most of your garden
The garden can be as much a part of your living space as your house, consider the access points and outside seating areas so you can get to everywhere (and where the sunny corners will be).
Parking considerations
Where is your parking, where will you enter/leave the house? Is there space for others to park and which door do you want visitors to enter/leave by?
Dual usage spaces
Do you need a spare room(s) and can these double up to be used for other things? I have a spare bedroom that is also a therapy room and store. Most kit is hidden on shelves behind sliding doors so when someone stays it looks like a bedroom. This means for the rest of the time it has a decent sofa (bed settee) so there is room for me to use the floor space.
Private spaces
Do you need ‘me’ space? If you always have other people in your house it’s important for mental well-being to have somewhere private just to chill and be private. Having two rooms that can double as occasional guest rooms means when friends who also have Personal Assistants visit there is room for them to stay over. And, if you have a lift and it breaks you have a downstairs bedroom.
Showering and bathing
Don’t skimp on the bathroom or wet room space. Make room if possible to be able to take your chair into the room and then transfer to whatever you need such as a change bed, shower chair or onto a bath lift. Both hoists and bath lifts need working space so allow not just for the equipment but for legs, feet and arms to stick out, with room if you need it for a personal assistant as well!!
Personal assistants
In a lifetime home do you need a personal assistant’s room and shower/loo? Should your adapted bathroom be just for you? Personal assistants should feel they have privacy so might need their own bathroom.
Future-proofing
Do you need to consider facilities for visitors and future family? This is important to combat potential passing on of bugs etc. Is there room for a downstairs loo to be big enough to be a wet room for visitors who stay over and sleep in the downstairs guest/sitting room?
What will it cost?
I am fortunate in many ways as I had a site and the money to develop the lifetime accessible home of my dreams. It would have been easy to spend double my budget as I had a huge wish list. Consequently, there were compromises along the way but we approached this by getting the architects to include all the features we wanted and then cutting back to bring it in on budget. Getting the build in on time and within cost meant knowing my parameters and planning ahead. Whilst it seemed painful at the time when it came to the actual build on-site it was really good that we had thought about, and specified, before we went out to tender, what was excluded in the build price such as a lift, specialist bath and the environmental control system. Conversely what was to be included in the tender price such as numbers and positions of sockets, flooring, specific doors and window suppliers.
Getting value for money
However, you fund your build you still want value for money. Most people do not have an open-ended budget so it is good to understand before embarking on the build both your maximum spend including any contingency funds you might be able to access. Also, remember moving in and making your house a home costs money too.
Everything has a cost
It is important to consider at the outset all the different things you can afford, and what will need to both plan and pay for. Here is a list of considerations that will need funding:
- Land or building to renovate/extend/redesign
- Architect
- Archaeological survey in a conservation area or area of historic interest
- Site Survey
- Planning Application
- Building Regulations
- M&E consultant
- Specialist advisor(s) for environmental controls, lift, hoisting points, specific equipment such as wet rooms and accessible bathrooms etc
- Quantity Surveyor
- Project Manager
- Builder and contractors
- Services eg water, gas, electricity
- IT and internet providers
- Interior fittings including kitchen, lights, power sockets, heating, air conditioning, alarms and more
- External fixings including lights, security systems, solar panels
- Hard landscaping eg boundary walls/fencing, gates, driveway and parking
- Garden design and meeting planning requirements including planting, green roof etc
- The nice stuff; flooring, curtains and blinds, utility room, storage, furniture and more
- And more…..whatever you think is your maximum add a contingency.
Keeping the costs in check
Some of these costs can be minimized in the design process by ensuring you know what you want and then not changing your mind in the building process. Once on-site changing your mind does cost money. For instance, decide on how rooms will be used. Where you will need pendant and wall lights, where you might need electrical sockets. Our advice is to never underestimate the number of sockets, if in doubt add more. Consider your kitchen space and layout right at the start then stick with it.
Construction methods
The other way we brought the build in on budget was to move from the build being architect led to a design and build construction. Once planning had approved the designs this allowed us to work with the builder and consider each design feature and if it could be constructed in a more cost-effective way. Overall we lost none of the main design features and did not exceed the tender price by changing our minds during construction. There were compromises, for instance, we discovered how extortionate it was to have environmental controls on bi-fold doors and had to decide if this was a necessity or a nice to have.
Love your neighbours
We invited all the neighbours who would be affected by building my house around for a BBQ. It wasn’t just those whose land shared boundaries with us but also families who would be affected by deliveries, parking of contractors and those who generally might have questions about the new build. A small group were not available on the day and in hindsight this is where we should have tried harder. They had concerns and rather than talk to us directly made full use of the planning process to voice their opinions and dissent. We recommend you do not underestimate what your neighbours might believe if they do not have the facts.
Practical considerations
Having working neighbour relationships is essential if you have shared boundaries, especially if they will be affected by the build. For instance: Might they be affected by noise? How long will the work take? You may also need to consider, and take advice on, whether you need party wall agreements. This formal document is not just for a shared party wall but also affects all works you undertake where your new structure may impact the foundations of a nearby building. A good party wall surveyor will look at the plans, work out the potential areas of concern, contact your neighbours, survey their properties for current defects and make detailed records. This is normally something the architect or project manager will take responsibility for appointing.
Role of the council planner
From a planning perspective the local council have a duty to consult those residents who may be affected by your building project. They need to take account of their views if they have relevant and reasonable objections. It might be a reasonable objection if you are going to have windows looking into their living rooms, but unreasonable for them to expect you to keep trees where you are going to build (unless they have preservation orders). It would be reasonable in a residential area to only be allowed on site between certain hours on weekdays and not on Sundays. Taking these considerations into account can only help your build.
Getting planning permission
This was the presentation I made to the local planning committee at the Council to gain planning permission.
 My vision
I’ve always dreamed, of my own lifetime accessible home. Just because I use an electric wheelchair, rely on technology, and have around the clock support, my aspirations to have a career, live independently, and have a family, are the same as my peers. I came to the University of York, 3 years ago. Now I live independently, and employ a team of assistants, who work under my direction, 24 hours a day.
 A lifetime home
My current rented flat does not meet my basic needs, I have equipment stored at my parent’s house, which means I often visit. But, much as I love my parents, I do not intend to move back in with them. We have searched for 2 years for a suitable property, that will meet my needs, not just for today, but for the next sixty years, or more. This is a once in a lifetime home, I will only build once, so have to get it right.
The environment
My shopping list for my home, included location, good public transport access, being part of a community, good local schools for my future family, and close to my extended family. I would like a home that faces the street, with level access to the street, my parking and the garden. I want the exterior to be virtually maintenance-free, and where possible, we considered green and sustainable options.
The search for a property
I had high hopes of the ‘housing association’ lifetime properties. I was very disappointed when I could not get my power chair around. We found most existing, and new build houses, have a small footprint, over 3 floors, making them difficult to adapt. In 2015, we found a house with a large garden, which we were able to buy, before developers got in first.
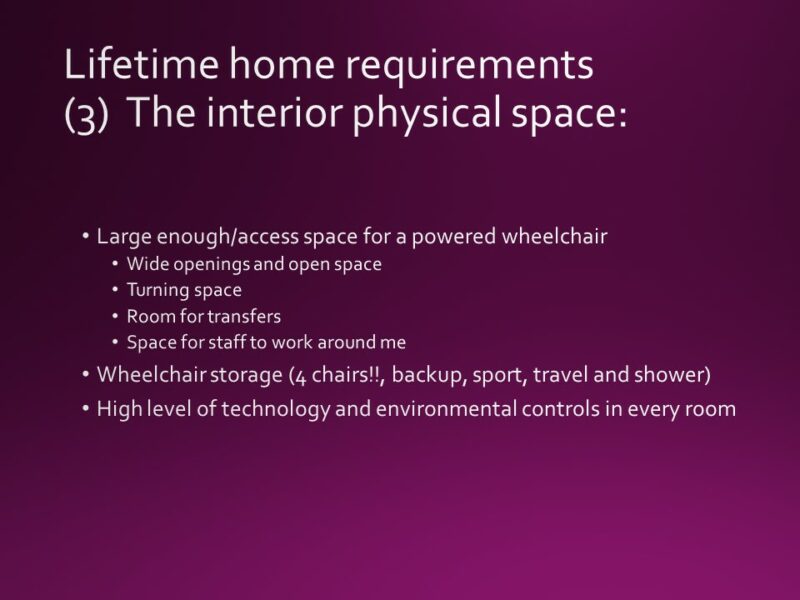 Space requirements
Before briefing my architect, I consulted experts, on space, and technology requirements. The rooms need to be generous, with wide openings, space to turn in my chair, for my equipment, and for staff to work around me. Besides providing staff accommodation, I need private space, for when I want to be alone. I’d also want to be able to provide for my own future family. From the outset we knew I needed a 2 story house.
Other considerations
I would like my own non-profit business. Daily travel is tiring, I want to go out to work, but not travel. And I know I will never work ‘full-time’ like other people. Even a home office needs to be adapted for access, with space for me and an assistant, specialist desks, environmental controls and equipment”.
My health is important. Being in a power wheelchair I need to exercise as much as possible, to remain fit for life. I am a keen athlete, I have represented England in my sport. I train daily, so the guest bedroom will double as a therapy/training room.
 The finished lifetime accessible home
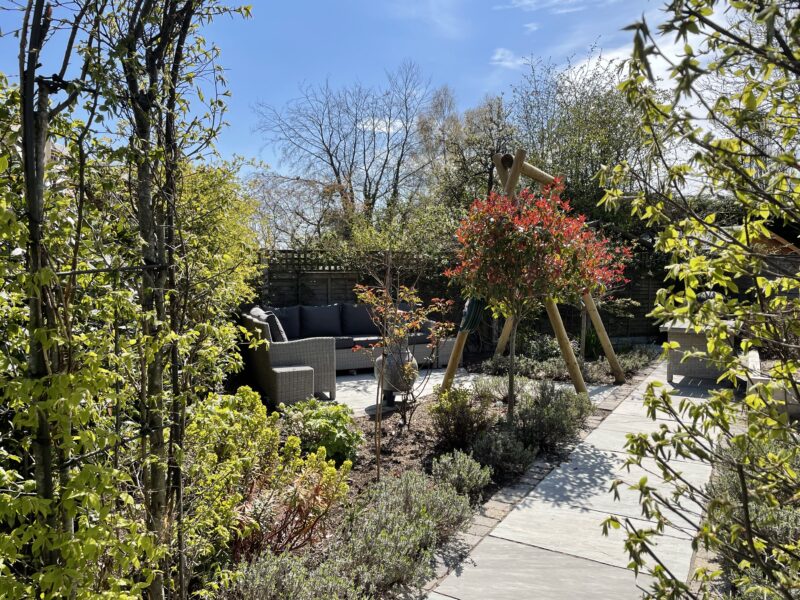
I loved every minute of my home being built, and today it delivers more than I could have dreamed of when we started the process.
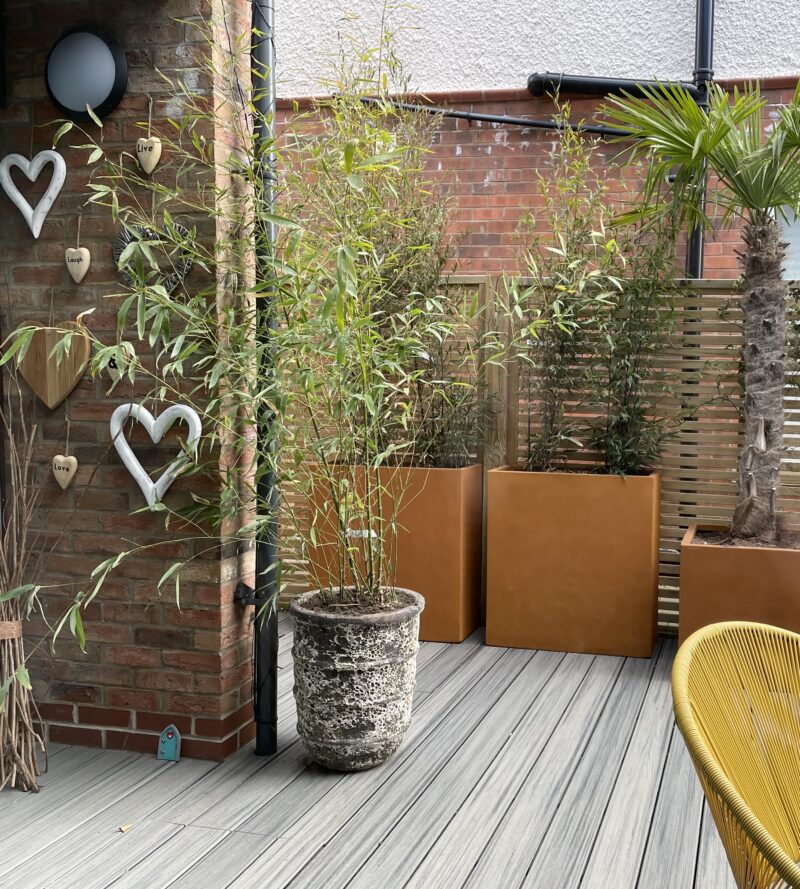
My more recent project has been the garden and making it an accessible and enjoyable space.
Good luck with your own project.
You might also find the following blog of interest:
UK guidance on accessible homes
If you found this interesting or
helpful please feel free to share.